Pages

Showing posts with label Pinspiration. Show all posts

Tuesday, April 22, 2014

'Your art is the best art of all the art...'

It the most heartfelt voice he could muster after seeing her watercolors in her art show, Roy Anderson tells Pam Beasley, "Your art is the best art of all the art."

Deep.

{I'm so sad if you don't know these people... that means you also don't know Michael Scott or Jim Halpert... My life is a little happier because of the humor they provide.  We're pretty close, you know.}

Friends, my life is lacking a little art...

If you saw my Living Room Tour, you may have noticed my very simple walls.  Though I've yet to tackle this problem, I wanted to share some of my inspiration for bringing a little LOVELY into my home:

This could EASILY be anything you wanted:  a tree, a child's profile, a unicorn. LOVE the pop of color.
source
 I LOVE CHALKBOARDS.  This chalkboard accent wall gives you the option to change the feel of your room depending on your mood!  For those of us that can't make decisions (ME!), this is FANTASTIC.
Source

I love the marquee letter!!  I would love to make one for my little guy's room! 
Source

Why not make a gallery wall??  Though there's not one large piece of art, the gold frames tie the gallery together.  I LOVE the ornate mirrors, and THE CHALKBOARD.  Obsessed.
Source

How fantastic is the geometric wall???  Top it off with a deer head AND a coral console... I'm in heaven.  Would you ever guess the wall was done with a SHARPIE?  I need one in my life.
Source
 One of my favorites:  Piece of plywood and paint.  Simple Concept, FANTASTIC result.
Source

Though I can't paint my wall with chalkboard paint OR draw on my wall with Sharpie (at least not while we're renting!), both ideas are concepts I can tweak for a rented home!  A chalkboard gallery wall?? Yes, please!

Ok, I'll stop with the chalkboards.

Are you inspired, too?? 

If you're NOT and you have the funds to purchase art, check out Hillary Butler {Fine Art} and         The Kibnit Creative.  Both ladies are SUPER talented and fantastic people.

DON'T FORGET, friends!

Enter our GIVEAWAY!!!!!  We're giving away some of our favorite beauty products to YOU for all of your love and support!!  We are so, so grateful for our bloggy friends!!!

To enter:  CLICK HERE!

Tuesday, February 18, 2014

Stuck in a Rut?

How many times do you look in your closet and just wanna cry like you did at 13 because you 'have NOTHING to wear!!!!' 

Please tell me I'm not crazy..

I get stuck in a fashion rut at times.. I then have to find inspiration to use what I already have in my closet and create a NEW outfit!  It's at times more thrilling than buying new clothes!

I tend to gravitate towards the styles that promote comfort.. kiddos at home require ease of movement, am I right?  So I've compiled a small collection of comfortable styles that you can possibly draw from your OWN closet:

Fashionoid  
twostringjane
Free People
Zipped
HauteLook
Feathers & Frills

Did you notice all the T-shirts??  COMFORT, y'all.  Add a statement necklace, some skinny jeans, flats or booties, and you're styled for a grocery shopping trip with kiddos in tow OR a lunch date!  I love how versatile T-shirts can be... Don't forget the messy front tuck or my Knotted Tee tutorial!

 My favorite places to look for inspiration are Pinterest, Anthropologie.com, ModCloth.com, Ruche.com, and my favorite fashion blogs, which include Merrick's Art, Zipped, and Cotton & Curls.

Thanks for reading, y'all!

-Jess

Tuesday, November 12, 2013

Colorblock Utensils


Being a pastor's wife, I have many weddings and baby showers to attend.  And don't get me wrong, I absolutely love going to all of them.  Seriously.....wedding and baby festivities are one of my favorite things to do.  And while I don't want to skimp on quality for each gift, I do have to be a little creative in order to stretch our money as far as we can.

So, I am always looking on Pinterest for ideas.  

When I search on Pinterest, I don't look for "easy DIY gift ideas".  I usually just look for items that I would like to make for myself, or that I would want in my own home that I think I could recreate.

I've seen these colorblock utensils from quite a few different sources and have been dying to try them. 

Some companies make them now and are usually only sold in specialty or upscale stores.  

We recently attended a wedding shower for an Ole Miss loving couple (hence the red and blue) and I wanted to give them something around this theme.

So, I got to work!


Target sells these large bamboo utensils in packs of 3.  

I taped them off low enough so that food would not necessarily have to touch the part where I painted.

I then used acrylic paint (I actually purchased a deeper royal/navy blue because I couldn't get the color exactly right), and sealed it with Mod Podge.  

Once it was dry, I removed the tape and they were done! 

I paired these utensils with a couple of hand embroidered dish towels!

(Spray paint and sealer could also be used - I was just trying to use the supplies I had on hand).

I'm itching to make some for myself now - maybe in a minty green color.....surprise, surprise!

What Pinterest projects have you tried lately?

Happy Tuesday, y'all!

Rox

Monday, April 29, 2013

Choosing Fabric


Choosing & coordinating fabric can be WAY too overwhelming!  I can't tell you how many times I have been ready to buy fabric for curtains (as we currently have NONE in our house...) before I chicken out.. I'm HORRIBLE at making decisions.. 

I finally took the plunge after gaining a little inspiration from some of my favorite home decor blogs and receiving a little birthday money!  (How lame... who spends birthday money on FABRIC??  And I was absolutely THRILLED about it... PLEASE tell me I'm not the only one!!)

Fabric.com proved to have a MASSIVE selection (making the choice so hard!) so I perused their website for at least 4 days before making my decision.  Plus, they always offer GREAT sales and free shipping over a certain amount.

Master Bedroom:

Sidenote:  My bedroom currently is the most boring place in the world... plain, undecorated, and drab... hopefully I can spruce it up a little with these prints!

1.  ZigZag in Village Blue/Natural by Premier Prints - I want a calming effect when I walk in my room... although, I also want a little interest... how about some light blue and zigzags!  I found THIS tutorial for a DIY rug that I'm dying to try with this fabric.  I'm excited give it a go!

2.  Java Ikat Driftwood by Magnolia Home Fashions - Although I only want to use this fabric for a couple pillows for my bed, I used this print as the base for my other two coordinating fabrics.  I LOVE, LOVE, LOVE the abstractedness (is that even a word?) and symmetry together in one print!!

3.  Towers in Onyx/Grey/Natural by Premier Prints  - Love this pattern.  I'm hoping the print is not too busy for curtains, but that's my plan for now.  I think the calm, neutral colors tone down the boldness of the print.


For the little guy's room:  (see his room tour HERE)

1.  Air Travel in Felix/Natural by Premier Prints - If you read/saw the room tour post, I mentioned wanting curtains for my P-man's room.  I knew I wanted a neutral-ish curtain since the bedspreads and bookshelf/toybox are bright green, and we have other bright colors on the walls.  I didn't want to overdo it with bold print and colors.  The frugal side of me thought I could easily re-use the fabric for pillows either in his room or in my living room!  I also didn't think the print was too gender or age specific.

2.  SeeSaw in Felix Blue/Natural by Premier Prints - I'm pretty sure I wanted to use this fabric for something in my little guy's room as soon as I saw it!  I immediately said no to curtains because of the bold and crazy, but I want to use the tutorial I mentioned above for a DIY rug... now I can't stop picturing the SeeSaw print as a rug in P's room!!  Can't wait to tackle that project!

One of the cool things about Fabric.com is their "Add to Design Wall" option.  You can add any 'swatch' of fabric to the design wall so you can see all your prints right next too each other.  No guess work on coordinating colors!  And if choosing coordinating fabrics is not your strong suit, they give you coordinating suggestions below each fabric option when you click on it!  Yay for making things easy!  If you can't find something that goes with a fabric you like, they add new prints ALL the time.  I found their prices to be very affordable with ENDLESS options.  After googling 'fabric.com promo codes' I found a 20% code that worked!  I'm pretty sure they offer discounts quite a bit so it wouldn't hurt to wait for a coupon offer!

Now I can't wait to show y'all my finished projects... check back with us to see the finished results and other fun projects!

If you want to stay connected with us, Follow us through BlogLovin' and Like us on Facebook!

If you have any questions, don't hesitate leave us a comment or email us OfDwellingandDress@gmail.com. 

Thursday, February 28, 2013

DIY Camera Strap Cover


I purchased a DSLR camera last year and have slowly been learning how to use it.  For all you experts out there, please don't judge me for how out of focus or crooked my photos are.  (And actually, the photo above was taken with my iPhone 4 camera.  I mean, if you can take a picture of your nice camera WITH your nice camera, you have some magical powers going on.)

And I'm about to reveal how much of a photographer I am not.  

Here goes.

From the beginning of my novice adventures in photography (i.e. How the heck does this thing work?, There are WAY too many options., and At least I'll look cool with this thing while I take blurry picture after hopelessly blurry picture of my poor kiddos.), the strap bothered me.  All I saw was this strip of fabric on which the wording served absolutely no purpose.  SO, while I may not have made much progress in the photography department, I know how to work some fabric magic.  (Second "magic" reference in this post?  I promise I'm not into that stuff.  Back on track, Roxanne.  Back on track.)

So, I got to researchin'.

On Pinterest, of course.

(I mean really, are there any other legitimate websites out there?)

I found everything from a tutorial on how to construct the entire strap, including all hardware, to a camera strap cover.  I viewed this project as something purely fun with not a whole lot of purpose (I don't NEED this), which helps me decide how much time I want to spend on it.  In this case, as little as possible.

So, camera strap cover it is.  

I used this tutorial from Doodles & Stitches as a guideline.

1.  Measure the length and width of the fabric part of your camera strap.  Add an inch to the width measurement and 2 inches to the length measurement.  (Mine was 23.5 in, x 1.5 in., so I cut 2 pieces of fabric 25.5 in. by 2.5 in.)

2.  Next, I ironed the pieces flat as well as folding the ends under once and ironing and then again and ironing again.  I straight stitched the ends to keep them from fraying and keep the ends folded under.

3.  Placing fabric with wrong sides together, I straight stitched each edge (longways) at the 3/8 in. marker on the sewing machine.  (Use pins to keep your fabric straight and together while stitching.

4.  "Serge" the edges.  On a regular sewing machine, turn setting to the zig zag stitch and let the far stitch go right over the edge of the fabric so the thread wraps around the side, creating the "serge" effect.

5.  Turn tube of fabric inside out using pencil with eraser to catch on the fabric.  Iron flat.  Pull camera strap through tube of fabric.

6.  Without back stitching and set at the widest straight stitch, sew the ends to the actual strap.  This keeps the strap in place but also leaves it easy to remove.

7.  Reattach camera strap to camera!


This project took about 30 minutes to complete from cutting out the fabric to putting my sewing machine and supplies away.  

Just use scrap fabric for a FREE and easy project!

Happy Sewing!

Rox

Thursday, February 21, 2013

Kids Closet Organization

Ok, those of you who really know me, know that I am a little bit of an organization freak.  Seriously, y'all, as nerdy as it sounds, my heart skips a beat when I see a good organization project.

So, you can only imagine my reaction when I stumbled upon this blog.  She has TONS of great organizing tips for every. single. room. 

I mean, with a name like 'I Heart Organizing', I knew we were destined to be soul mates. 

Too much?

Too much.

Where was I?  Oh yes, my organizing obsession.

Don't get me wrong, every square inch of my house if not perfectly organized at all times.  There are closets and an entire garage and attic that are complete disasters as we speak....err, I write, you read....you know what I mean.

But another thing you should know about me is that I am a perfectionist.  Seriously......I took the DISC personality test recently and it described my personality as a perfectionist.  (Side note:  I think it's a little unfair that I am the perfectionist and my husband is the inspirer.  Mine sounds so negative while his sounds so......inspiring?  Not. fair.)

I digress.

Basically, because I am a perfectionist, either something is perfectly organized or it looks like a bomb exploded in my closet, attic, garage, etc.  

And I will admit this is not the worst my boys' closet has ever been, but it was getting to the point where I couldn't stand to even look. Basically, I would throw whatever item belonged in there and quickly shut the door.  So, something had to be done.


All the containers I used, I already owned except for 2 of the plastic drawers (They are Sterilite brand purchased from Target and they hold a TON).

One of the problems I have come across with organization is that if I am the one organizing and don't have anything labeled, things get messed up pretty quickly because......surprise, surprise......I am the only one who knows where anything goes.  SO, as obsessive as it may sound, I have started labeling containers, mainly ones found in closets.  That way, everyone (ahem....hubs and kiddos) knows where everything goes.

So, with the help of my bestie, Pinterest, I found these free customizable labels from Better Homes and Gardens and got to work.  I printed, laminated, and attached them with clear packing tape (I got fancy, y'all).


And wallah!  A nice, organized closet with room to grow!

Swoon.


(Above)  The boys pajamas and bottoms are in the lowest 4 drawers, within reach, so they can get their own clothes when I ask them to.  Out-of-season and clothes they can grow into are stored in the top drawers out of reach.

(Below) And here is a close up of the labels.


Whew.

Got a little personal in this post, revealing the skeletons mess in my closet and all.

Happy Organizing, y'all!

Rox

Saturday, January 5, 2013

Flowy Dress to Fitted Skirt

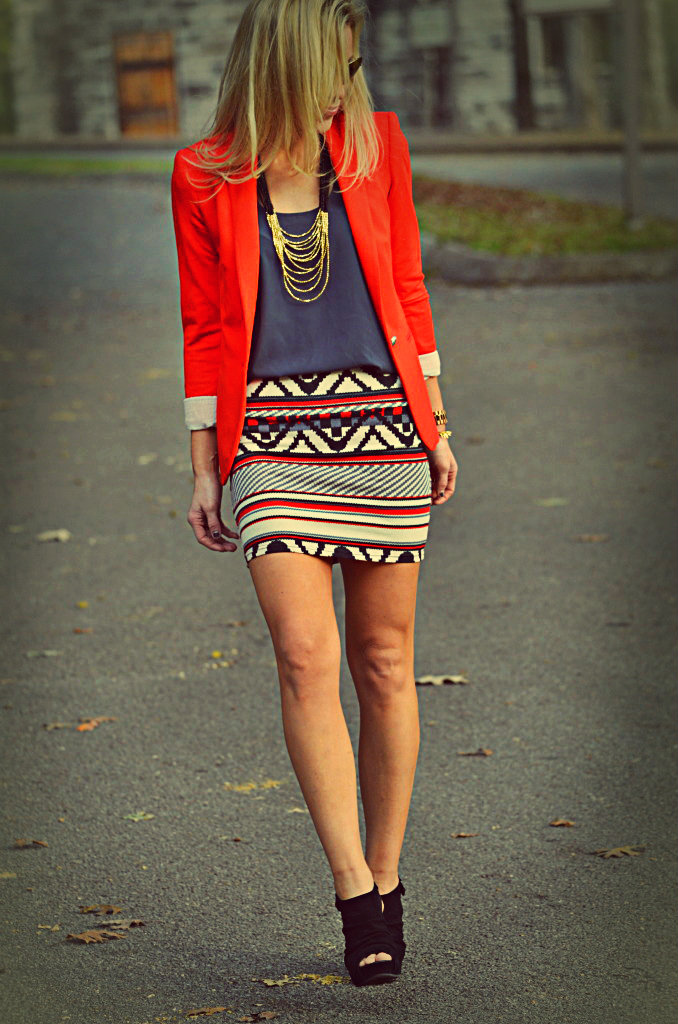
Blazers.  Fitted Skirts.  Statement Necklaces.  My current semi-obsessions...

You may have seen this outfit floating around the Pinterest world...
Source: Happily Grey
Is it weird that I keep looking at it over and over?? 

Yes.

So... I was browsing at Goodwill recently and saw a print that IMMEDIATELY made me think of this outfit.   (Even though the inspiration photo is a little more tribal than geometric... we can overlook that right?) I decided to stop looking at the outfit and make somethin' happen!


I knew with the amount of fabric in the skirt portion I could manage something.  PLUS there was  elastic in the back meaning even MORE fabric!  Here's what I did:


1. I first cut off the "bodice" portion (just above the waist).  I intended to use the original waistline since it had elastic shirring in the back, but it had a weird fit. SO. I cut off the waist line, too.
2. The blue liner was a little longer and had a ruffle (which I didn't like) so I cut it off.
3.  I found a skirt of which I generally liked the way it fit and used it as a template. I would recommend pinning the template skirt to the liner, use a fabric marker or chalk, and THEN use a straight stitch to sew up the sides. *Make sure the liner is inside-out.* I wanted to just do the liner so I could make sure it fit well under the outer portion of the skirt. To finish the bottom of the liner, I just zig-zag stitched the edge (since I don't have a serger) because I knew you wouldn't be able to see it. (I like short-cuts!)
4. After I tried on the liner, I took it in a couple more times until I liked the fit. *Remember the liner needs to be a little bit tighter than the outer portion so it's not bunchy underneath.* I laid fitted liner on top of the skirt and repeated step #3.
5. To prevent fraying on the top, I zig-zagged again. After all of the chopping I did earlier, the skirt was starting to get shorter and shorter.  I couldn't use much more of the skirt to make a casing for elastic so I found an old black T-shirt to make my own.  The width of the T-shirt was exactly the same size as the skirt (SCORE!) so I just cut a strip that was just over double the width of my elastic (*Remember your seam allowance!*)
6.  I cut my elastic to my waist measurement + 1 inch (to sew the elastic together).  I folded the T-shirt strip in half, lined up the raw edges (skirt & liner, and both layers of the T-shirt strip casing), and pinned it all the way around the skirt.  Since the T-shirt doesn't fray, I used a straight stitch almost all the way around.  (*Remember to leave an opening for your elastic!!*) Thread your elastic through the casing, and sew the ends together. FINALLY, sew closed the gap left for the elastic. DONE!


I had the fun blazer on earlier and that random tuft of hair at the nape of my neck pinned back... ANYWAY.  Here's the after!  I'm very pleased with the outcome and can't wait to wear it again!