Pages

Showing posts with label Furniture. Show all posts

Friday, August 26, 2016

Turn File Cabinets into a Desk!


One of the many challenges with moving to a new house is figuring out how to fit furniture in ways that are functional and aesthetically pleasing!  It's sort of like Tetris.  But with prettier colors and shapes.

We have a large, yet weirdly shaped open living room.  Our only furniture configuration leaves an empty corner in which I've placed a wingback chair that had no other place.  I wanted a functional, yet pretty spot to use as a mini home office/homework spot.  For cheap.  BUT.  I want it be pretty.  I want, I want, I want, I want.. Yikes!  Now we come to the WHOLE point of this post:


I found matching two-drawer file cabinets at Goodwill for $6 each! The price range for brand new file cabinets is $40-$150. That alone was a deal!  (Goodwill can be overpriced at times, but sometimes you get 'lucky'!) 

I bought six 1x4's (6 feet in length) from Lowe's and cut them 5 feet in length.  After lightly sanding down them edges and corners, I stained the planks with Minwax stain.  I used two light coats of the Classic Gray color, and then one light coat of the Honey color.  The mixture of the two stains gives an aged look instead of just stained.  Had I not spilled about 7/8ths of the Honey colored stain, this project literally would used a teeny tiny bit of stain!  I COULD have sealed them with wax or polyurethane, but we will NOT be using this surface for food so I left off that step!

Next, I already had 8x1-1/4" screws and 1x1-1/2" wood pieces that are cut in 17 inch lengths.  I pre-drilled the holes so the 1x1-1/2" wood wouldn't split and attached the connector pieces to the 1x4's.  I attached the connector pieces 24-3/4" apart.  I didn't use 1x1/2" cut to the actual depth of the table because I didn't want to be able to see the connector pieces poking out when you look at the front of the desk.

I did NOT attach the table to the file cabinets.  I placed the table portion on top of the cabinets with the connector pieces lying on the inside of the side of the cabinet.  For now, this works perfectly!  The table is heavy enough that it doesn't shift or shake.  


And there you have my easy, frugal solution to an empty corner of my living room!  My oldest is excited to have a special desk to use for homework, and I'm happy to have another surface and area to decorate! 

Here's the breakdown of the materials and cost:

2 Two-drawer file cabinets = $12
6 1x4's (6 feet each) - 6 x $3.72 each = $22.32
Sandpaper (already had it!) = $0
Stain (already had the Honey color) = $7.77
10 8x1-1/4" Screws (already had them!) = $0
1x1-1/2's cut into 17 in. (already had it!) = $0
Total = $42.09

Considering one of the purchases (the stain) will provide MANY more uses, this is a GREAT deal for a customized piece of furniture!

Thanks for reading, friends!!

Jess

Tuesday, May 6, 2014

{DIY} Chalk Paint & Tinted Wax


Y'all, this might be old news to you.  IF NOT, join in the fun of CHALK PAINT!  Annie Sloan has hit the DIY world by storm with her lovely paint-y ways... distressed furniture heaven...

BUT, I have yet to use hers... Shame on ME!  My DIY is totally a knock-off, and I can't tell you how it compares.  I just know I love the result and think it looks similar at least to what I've seen painted with Annie Sloan's paint.

I started out with 'Oops' or 'Mis-tinted' paint from Wal-Mart (also can be found at Home Depot and Lowe's).  I found a FANTASTIC soft, mustard-y yellow that looked even MORE fantastic at 50% off.  
Here's the chalk paint recipe I used:
1/2 cup baking soda
3 Tbsp. water
1 cup paint

Mix baking soda and water into a paste.  Add paint to paste until completely incorporated.  Use immediately OR let sit for a 'chalkier' texture.
(I've done both.. letting it sit does allow for a thicker first coat of paint)


-I used a small paint roller for the first coat on the large area, but a paint brush proved to be just as fast.  There's not need for the strokes to be absolutely perfect.  This is supposed to look OLD so the sloppier the better! 

-The second coat covered the rest of the table.  I didn't need an extra thick coat since I wanted the dark stain to show through.


-After the paint dried (it dries quickly!!), I lightly sanded all over the table but especially on the edges.  I made sure to allow the original stain show through on the places that would naturally be bumped and scraped.

-For tinted wax, I used Minwax Paste Finishing Wax (found at Home Depot) and Minwax PolyShades in Antique Walnut and Bombay Mahogany.  There really was no specific recipe here.  I just scraped out a good amount of wax into a tupperware bowl, poured in a little of the PolyShade, and mixed it until it was incorporated.  Using an old T-Shirt, towel, cheesecloth, or even one of Annie Sloan's special waxing brushes (which I hear are fantastic!), rub the tinted wax in small circles until the desired look is achieved. I suggest to test it out on a discreet corner of the table (or whatever you're painting) to see if you like the shade.  My first try was a little light so I just added the PolyShade until I was happy with the tint.  Also, rubbing in CLEAR wax BEFORE using the tinted wax prevents the color of the actual paint changing shades... instead, the wax just gets into the cracks and crevices.

If you WANT, you can finish it off with a coat of clear wax.

And.  THAT. Is how it's done.


I can't tell you how much I love my new table!!
I may or may not be obsessed with DIY chalk paint...
I may or may not have done a bunch of other projects because I loved it so much...
I may or may not have quite a few other projects up my sleeve...

What do you think??

Thanks so much for reading, friends!

-Jess

(Recipe for Chalk Paint recipe found HERE!)

Tuesday, February 4, 2014

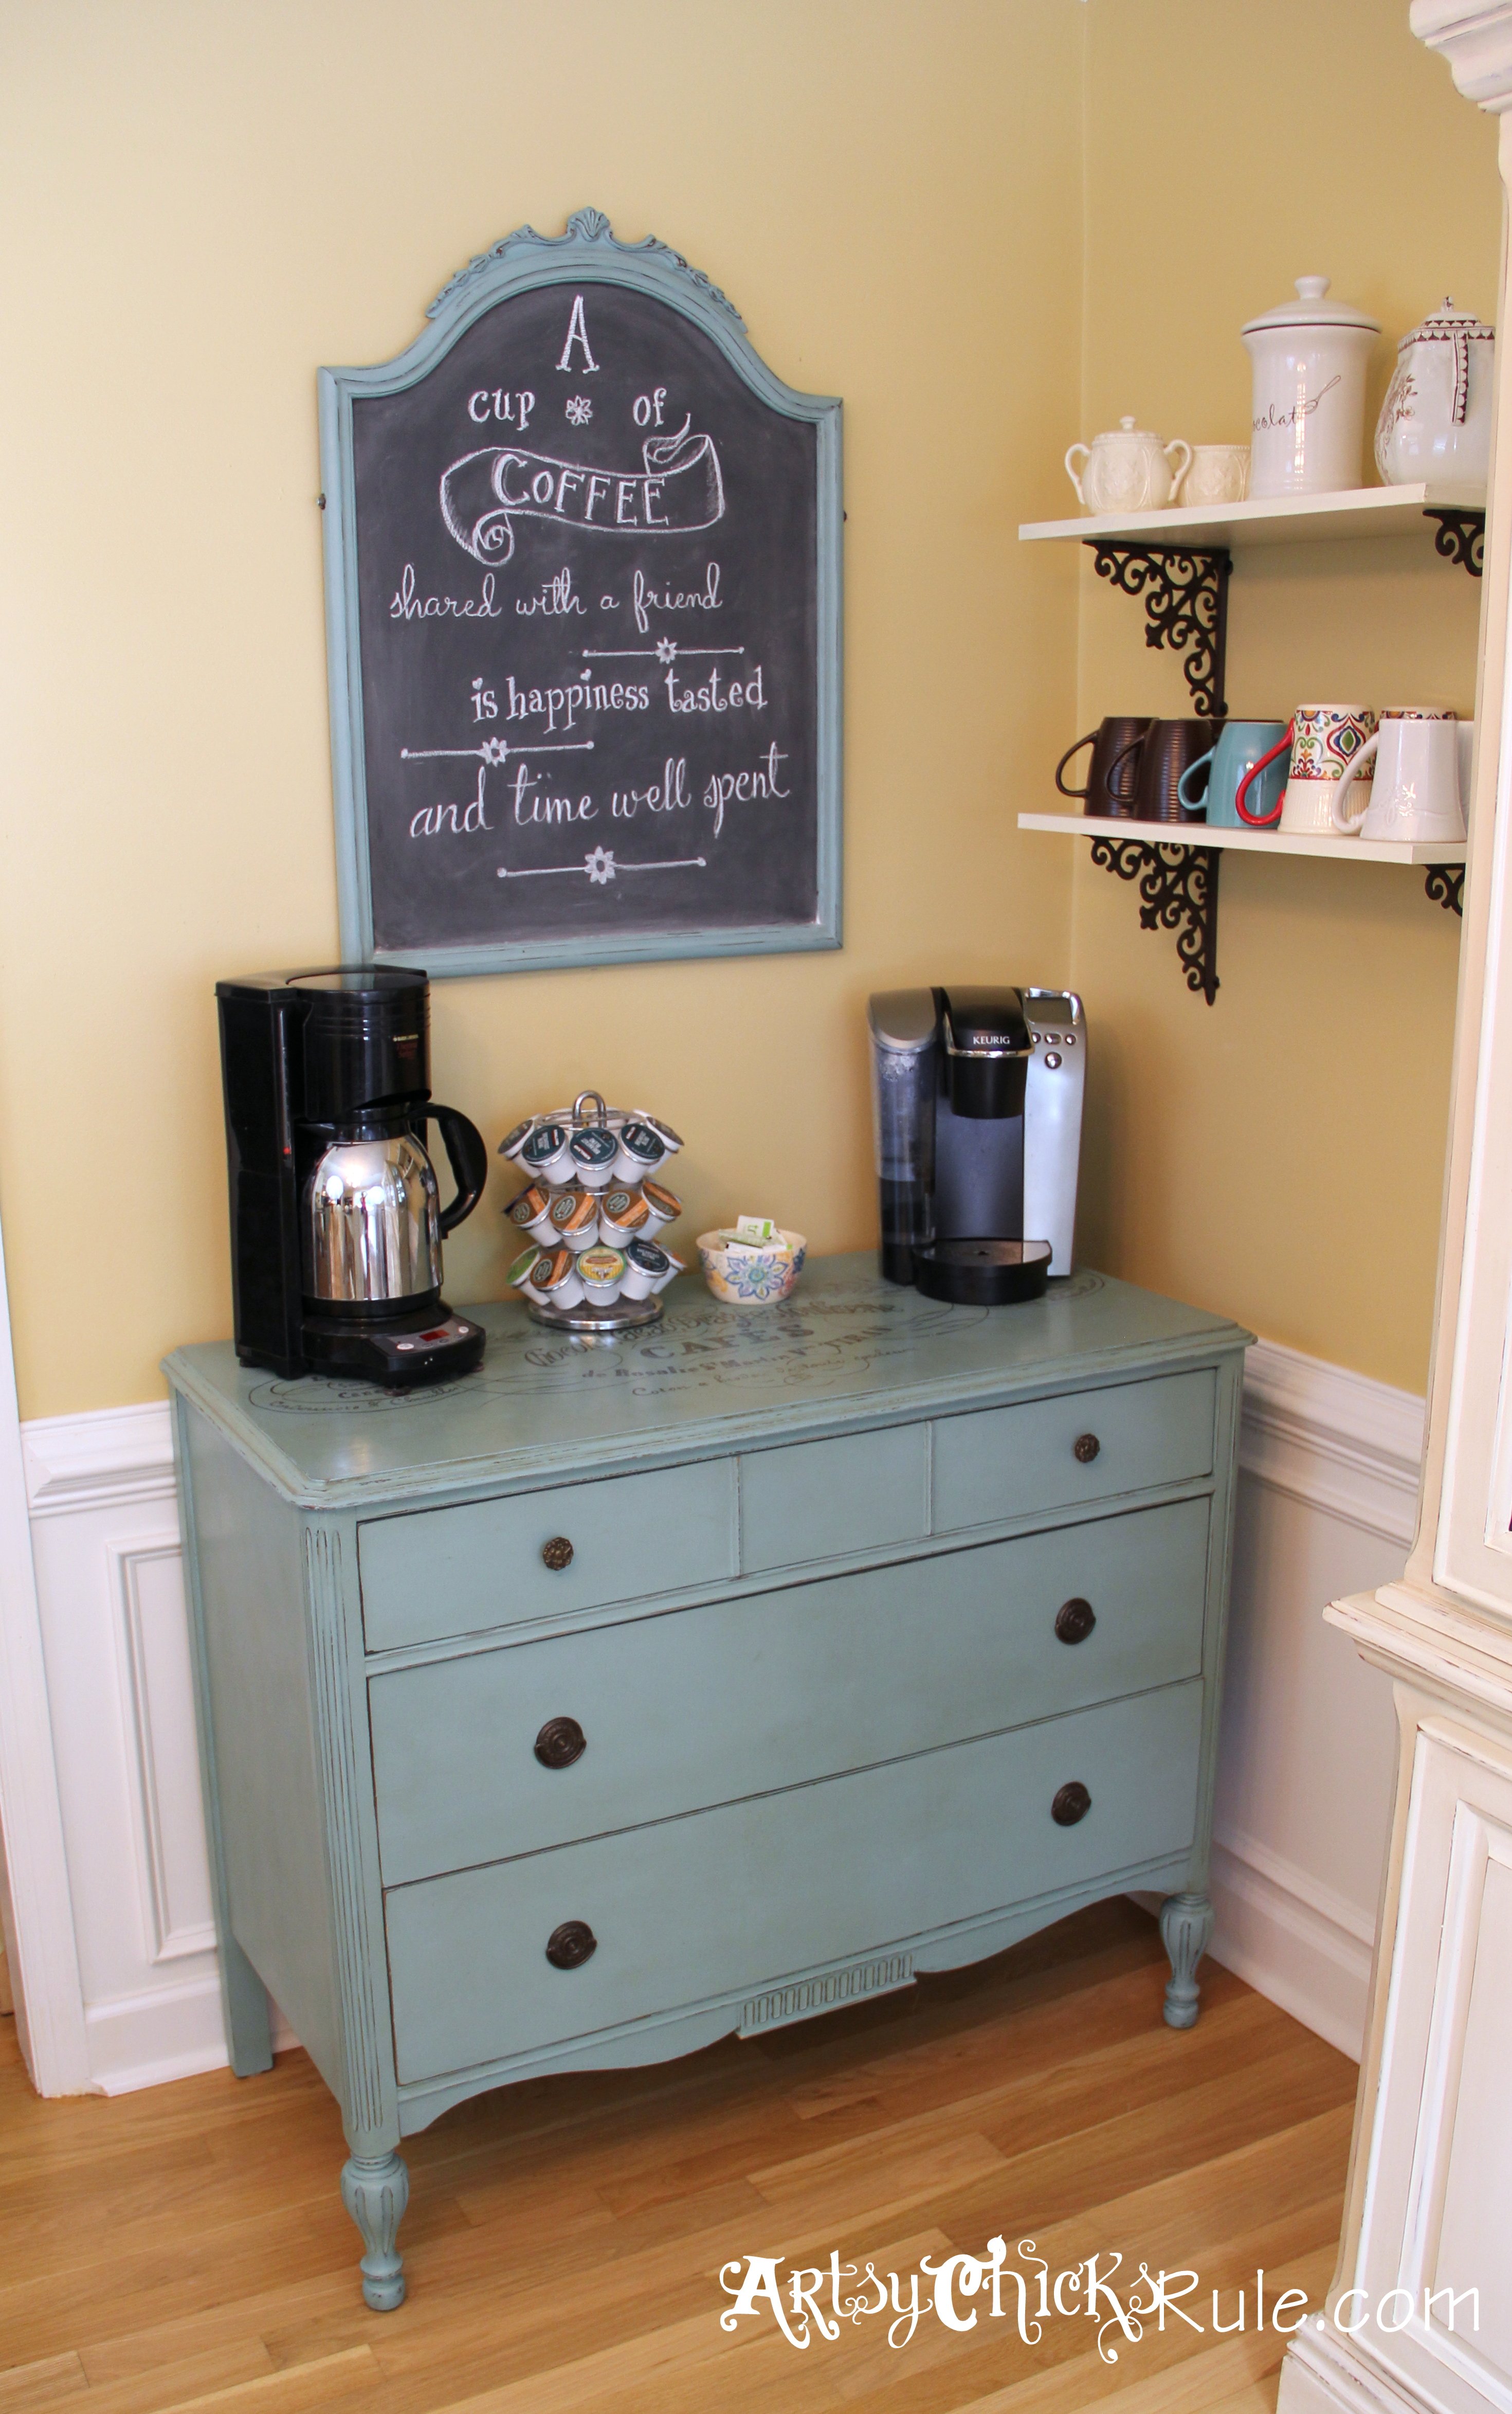
My Very Own Coffee Bar!


We are so excited to get back to the bloggin' groove!  All of our lives over the holidays were completely full of celebrating, decorating, relaxing, unpacking, traveling, lovin' on family, missing each other, organizing, eating, and the list goes on!  We are so grateful for y'all bearing with us as we tried to catch our breath a little over the break!  We have some fun stuff in store for y'all so PLEASE join us as we dive into a new year!

Remember way back ( HERE ) when I dreamt of a coffee bar?

Guess what...


That's right, folks!  I finished a project, followed through on a plan I had, and I LOVE IT! 

I wanted one MOSTLY out of necessity.  Our new place has a very small kitchen... so with a coffee pot and microwave on the counter alone, I was making PB&J sandwiches at the dining room table instead of in the kitchen.  Plus, why not dedicate an entire wall of your house to something you use EVERYDAY.  My dear coffee, you're worth it.

Do you remember the dresser? Look HERE.


Our coffee bar takes up a wall in the dining room and creates extra storage for everything from pens and paper to extra coffee mugs and tea.  We're excited to actually have a dining room in our new place!  I can't wait to turn our table and chairs into my next big project... I promise to share it with you!

We use the wall opposite of the coffee bar as our catch-all.  The front door is right around the corner (to  the left) so it was the perfect spot for our 'mudroom'.  The chest of drawers balances out the other side of the wall AND adds almost necessary extra storage for craft and sewing supplies.  I made sure to save ONE WHOLE DRAWER for the hubs books and such.  Poor guy was having to keep his books in the trunk until I organized a little... 

Please know that our dining room NEVER looks this clean... real life is a trash can in the corner by the coffee bar, hats and jackets on the table, crumbs covering the floor, sticky-ness all over the table, shoes on the floor, junk mail, books, artwork, that mornings half-eaten breakfast... It's always great to have an excuse to clean up!  This was mine!

Thanks for reading, y'all!  It's great to be back at it, and we so look forward to sharing a lot more with our faithful followers!

-Jess

Wednesday, August 28, 2013

I Dream of Coffee.

I keep hoping that I can share about my family's life change with pictures... BUT it's not gonna happen...

My family has MOVED!  My husband started seminary last week for Marriage and Family Therapy, and we are SO excited for our new adventure!  New school means new town, new friends, AND new home!!

I look forward to sharing pictures with you, but I have yet to find time (plus lighting, ROOM to move, etc...) to take them!

For now, you can join me in dreaming about all the ways I can set up my new home!

I'm very excited to have a dining room this time around, but I am now lacking storage in the kitchen...  I decided that a buffet/coffee bar would help with storage!

Here's some of my inspiration:
via Life More Lovely

COLOR!  Love the hanging mugs.  Baskets.  Shelf is a must!
via Inspired by Charm

I do like the clean look without mugs hanging down.. 
via Artsy Chicks Rule

I'm pretty sure I will have a chalkboard SOMEWHERE around my coffee bar.

I love the simplicity here.
via Caught in Grace

This may be my favorite look.  I love the white shelves against the white walls.  It gives it a very clean look.

I will be using a dresser as the buffet (possibly adding legs to the bottom like Rox did HERE), and a shelf or tow above the dresser!  Hopefully it will serve its purpose while adding visual interest at the same time!

I can't wait to work on it and share it with you!

What are your coffee bar must-haves?

Monday, June 24, 2013

Home Tour: Jess' House {Master Bedroom}


Although I'm happy with my bedroom right this moment, it's definitely in the 'not-quite-done' stage.  I don't necessarily have very specific ideas in mind for the 'finished product', but I don't just completely LOVE every tiny detail.

With that in mind...


I'm so grateful for our bedroom suit!  We have PLENTY of storage space with all of the drawers so we don't have to have random stuff piled all over the dresser.  (Notice that I said 'don't have to'... our room is usually the catch-all for normal days... if company comes over, I usually throw everything in our room and just close the door!)

Our super simple white quilt makes our bedroom very versatile... I feel like I can change things very easily without feeling like I want to buy brand new bedding!

Have y'all seen my pillow on Pinterest??  Chances are you've seen THIS tutorial before.  SO easy, so simple.  Mine's not as nice as the pin, but I used thicker material... it's seems like the thinner the material the better.

The wreath above my bed was made using faux pussy willow branches (Wal-Mart).  I stretched a wire hanger into a circle and just wrapped three branches around the circle.  This is one of the things I like ok in my room, but I would LOVE to hang a starburst mirror here instead.  I'd rather use my wreath on the front door!

(Excuse the the dark frame around the picture... no clue what happened!)

My beside tables get cluttered SO easily.  I decided that if I had trays on them I may keep them more organized.  Or the trays would just hide the junk I tend to throw on them...

I bought my cute coral lamp from a Facebook yardsale in my town.  Although I love the color, I'm pretty sure I want to paint it eventually..  I bought the gooseneck lamp from Goodwill WITHOUT a shade on it...  I thought I liked the look of it with the shade, but it's starting to just look out of place.  Any suggestions on what to use for a replacement shade? Or how to make one??

I just recently added the mirrors over my bedside table, and it's made a huge difference in the look of the room!  It's definitely made the room look a little bigger, and I LOVE the reflection of the lamps when they are on.  I loved the IDEA of the four mirrors paired together instead of one big one of the left side, but now that they are on the wall, I would like to add larger frames to them.


I haven't done much with my dresser... like I said, it's usually full of junk.  My lamps are boring (remember the lamps I mentioned in THIS post?), and it's just empty.. we'll see what happens there.

I absolutely LOVE my curtains!  You may remember my 'Choosing Fabric' post, and you can see the pattern close up.  The neutral colors make the pattern very, very subtle.

The chest of drawers (or better called 'Chester Drawers' here in the South) most recently held a large OLD school T.V.  That thing was a HUGE eyesore.. so for now, it houses a couple wedding photos of my boo and me. :)


Last, but not least, I have my photo wall... I made these burlap photo holders not too long after we moved in our house (about four years ago).  They've served us well.  I covered cardboard with burlap and added ribbon and photo corners.  I have yet to frame my nice prints... these are my cheap-o Wal-Mart prints and are not covered... my photographer was SOOO great y'all.  I still LOVE my pictures so much!

That's about it folks..

Check back to see more of my house! :)

Monday, June 17, 2013

Goodwill Dresser Redo


I'm back from my weeklong absence from the ole blog and thought I'd post an oldie today.

If you followed my personal blog in the last couple of years, you probably saw this post already.  If not, it's new to you!

I purchased this dresser from Goodwill for about $30.  It was not in the greatest shape but that was totally fine with me since my plans were to paint and distress it anyway.

I just used some paint, antiquing glaze, a sander and topped it with one of my favorites, Johnson's paste wax.

{ A relative of my hubby's introduced me to Johnson's paste wax a few years ago, and I have used it on countless pieces of furniture since.  I LOVE the matte finish and it seems to hold up really well.  If you want to purchase it, you'll actually find it in Home Depot or Lowe's on the cleaning aisle. }


I also purchased some oil rubbed bronze drawer pulls to complete the piece.

The whole process was not nearly as intimidating as it seem, I promise.  


Have you redone any furniture lately? 

What are your favorite products to use?


Happy Monday, y'all!

Rox